API Delivery Docs

Create an Order
Start by creating an order with our API
View Docs
Calculate the Cost
Calculate the delivery cost of each order.
View Docs

Documentación

API REFERENCES
Conoce nuestra guía y ejemplos para integrar Picker a tu sistema
Ver Guía

API Delivery

Conecta nuestra plataforma logística a tu
sistema para hacer tus entregas.
Ecommerce
App
POS

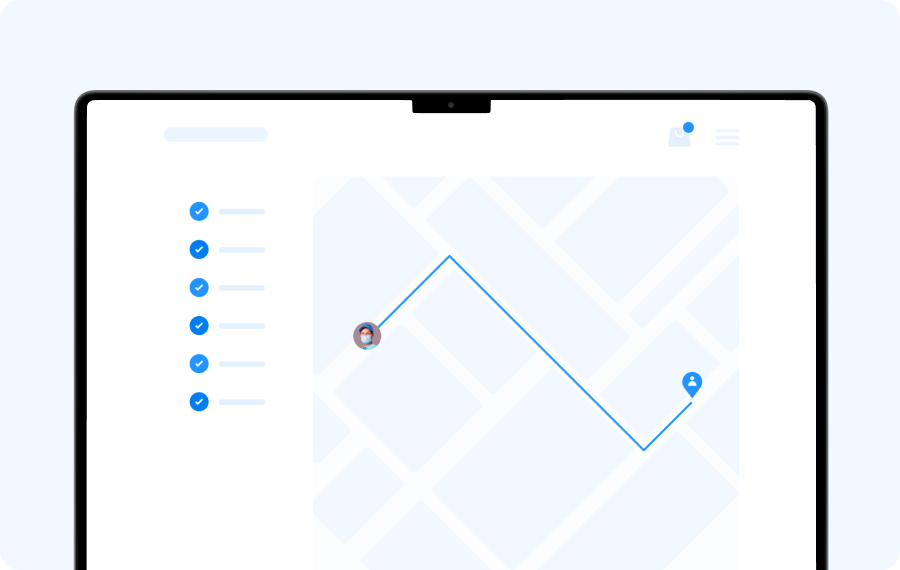
Dashboard de Control

Conecta nuestra plataforma logística a tu
sistema para hacer tus entregas.
Ecommerce
App
POS

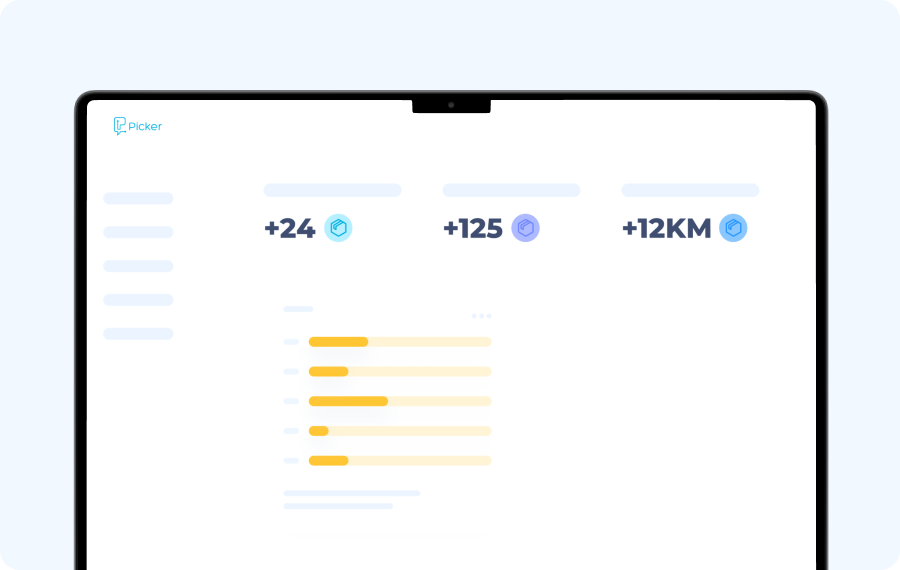
Dashboard de Analítica

Conecta nuestra plataforma logística a tu
sistema para hacer tus entregas.
Ecommerce
App
POS

How does the Delivery API work?

In digital commerce, home deliveries are an important axis of the business model and at Picker we know it. In order to build an integration with Picker that handles your deliveries seamlessly, it's important to know how what we don't see works.

Check distance and price on your platform

When your customer fills their cart and is ready to checkout, your platform queries Picker live for the distance between the points and returns the delivery cost.

Order creation

Once the client confirms the order, Picker is sent the Booking Details with which we will create the order on our side.

NOTE: The search for a delivery person starts when the order is created.

Driver search and assignment

Picker's RADAR system will locate and assign the order to the delivery person closest to the collection point.

Data return

Picker returns the order data: delivery person, ETA, phase of the order, time, distance. You can use this data to control your dispatch or that of third parties.

Tracking URL

Picker sends your customer a URL that opens an order tracking window in their web browser. This URL can be sent by SMS, Mail or WhatsApp.

Integrated Chat

Your client will be able to communicate with the delivery person through the integrated chat, to finalize delivery details.

Closing of the order

Once the delivery is confirmed by the delivery person. The completed order status is sent.

How is the delivery cost calculated?

API Reference
Your client must be able to know the exact value of the delivery to pay even before confirming their order. That's why Picker developed this connection that allows you to check the cost based on distance and receive an exact value to place it in your eCommerce.

1. Endpoint /api/preCheckout

Your Server
Picker use /api/preCheckout as an endpoint to receive the following data: the API Key of the store (collection point) and the coordinates of the delivery point of an order and thus be able to calculate the cost of delivery between those two points.
fetch(“52.48.166.156:303/api/preCheckout”,) { method: “POST”, headers: { “Content-Type”: “application/json”, “Authorization”: “Bearer” {{apiKey}}” //API KEY DEL LOCAL }, body: { latitude: -2.192912, longitude: -79.888705 } //COORDENADAS DE PUNTO DE ENTREGA }) .then(response => response.json()) .then(result => { console.log(“Success”, result); }) .catch(error => { console.error{“Error:” , error); });
Copy

2. Recibir deliveryFee

Your Server
Picker use /api/preCheckout as an endpoint to receive the following data: the API Key of the store (collection point) and the coordinates of the delivery point of an order and thus be able to calculate the cost of delivery between those two points.
{ “statusCode”: 200, “message”: “Success”, “data”: { “deliveryFee”: 2.42 } }
Copy
{ “statusCode”: 400, “error”: “Bad Request”, “message”: “child “latitude” fails because [latitude is required], “validation”: { “source”: “playload”, “keys:” [ “latitude” ] } }
Copy

3. Proyectar deliveryFee

Your Server
The value that Picker returns to you is the one that will accumulate in your Billing. On your side you can use the same value directly or implement your own value. We recommend the second option as it gives you the flexibility to create promotions or discounts without relying on Picker.

Create an order

API Reference
The creation of an order is the second step of the complete flow of our service. It is the moment in which Picker is requested to start the search for a nearby delivery man and proceed with the assignment.

1. Endpoint /api/createBooking

Your Server
Picker use /api/createBooking as an endpoint to receive the data required to create an order. The mandatory data for the creation of an order ranges from the API KEY of the premises, customer name, telephone number, coordinates of the delivery point, etc.
fetch ("https://dev-api.pickerexpress.com/api/createBooking") { method: “POST”, headers: { “content-language”: “es”, “Authorization”: “Bearer” {{Token}}” //API KEY generada para el usuario }, body: { orderAmount: 9.9, //Cantidad de dinero que cuesta el producto paymentMethod: “CASH” //Método de pago para el pedido. CARD/CASH longitude: -2.31233, //Coordenada de longitud del punto de entrega del pedido latitude: -1.312313, //Coordenada de latitud del punto de entrega del pedido city: “Guayaquil”, state: “Guayas”, zipCode: “0245”, address: “Miraflores principal”, //Dirección de entrega del pedido customerName: “Pedro Ruiz”, customerLastName: “Ruiz”, customerEmail: “pedro@sancho.com”, customerMobile: “096737271299”, customerCountryCode: “+593” // Código del país sendSMR: "false", // Si es true, Picker envia una notificación con el link de tracking al cliente; Si es false, no la envía businessDeliveryFee: 2, // Precio que va a cobrar por el servicio de entrega cookTime: 100 // Tiempo de espera en milisegundos para el inicio de la búsqueda de conductores reference: "Esquina casa roja" // Referencia a dirección de entrega externalBookingId: "444511" // Id de referencia de tu pedido } }) .then(response => response.json()) .then(result => { console.log(“Success”, result); }) .catch(error => { console.error{“Error:” , error); });
Copy

2. Receive Booking Details

Your Server
Picker returns a JSON with the data from BookingDetails. This is all the relevant information of an order. This information is used to track the details of the order, the most important data being the order ID. Unique identification code.
200: OK
“statusCode”: 200 “message”: “Success”, “data”: { “bookingNumericId”: 3731 “createdAT”: “2020-01-14T21:50:04.598Z”, “customerName”: “Edison Mora”, “customerMobile” “+593992555555”, “bookingType”: 0, “typeText”: “PICKUP_AND_DELIVER”, “paymentMethod”: “CARD”, “paymentMethodCode”: 1, “carType”: 1, “carName”: “BIKE”, “_id”: “5e1e378c0c4148200487a01a”, “statusUpdates”: [], “statusText”: “READY_FOR_PICKUP”, “currentStatus”: 22, “distanceBreakUp”: { “extraDistance”: 0, “baseDistance”: 0, “billedDistance”: 3.51604391981227, “realDistance”: 0, }, “totalAmount”: 2.7, “totalPay”: 2.7, “ServiceAmount”: 2.7, “orderAmount”: 0, “deliveryFee”: 2.7, “pendingAmount”: 0, “priceBrakUp”: { “taxCharges”: 0, “tip”: 0, “donation”: 0, “comission”: 0, “referralDiscount”: 2.7, “promoDiscount”: 0, “recieveByDriver”: 0, “extraPayment”: 0, “businessPayment”: 0, “companyPayment”: 0, “driverPayment”: 0, “orderAmount”: 0, “perMinCharge”: 0.4, “perKmCharge”: 0, “baseFare”: 2.3, }, “vehicleColor”: “null”, “pickupCoordinates”: { “coordinates”: [ -79.898705, -2.162912, ], type: “Point” }, “pickupAdress”: “Kennedy Norte, Calle Justo Cornejo y Av. Luis Orrantia, Edificio Torres Atlas, Piso 5, Oficina 2, Guayaquil, Ecuador”, “pickupZipCode”: “123455”, “pickupState”: “Ecuador”, “pickupCity”: “Guayaquil”, “deliveryCoordinates”: { “coordinates”: [ -79.88705, -2.192912 ], “type”: “Point” }, “deliveryAdress”: “Hola”, “deliveryZipCode”: “1234”, “deliveryState”: “Ecuador”, “deliveryCity”: “Guayaquil”, “driverEmail”: null, “driverImage”: { “original”: null, “thumbnail”: null }, “driverMobile”: null, “driverName”: null, “driver”: null, “customerEmail”: “edan@edan.com” “customerImage”: { “original”: null, “thumbnail”: null }, }, },
Copy
400: Conflict:
This conflict occurs when the delivery point is out of range.
“statusCode”: 400, “error”: “Conflict”, “message”: “Sorry we don’t have coverage of this area yet”
Copy

3. Bookings

Your Server
It is important to know that the order is created at the time the data is sent to the endpoint /api/createBooking. If on your platform there is the option of deliveries at a specific time or on a specific day, it is preferable to make this call on the appropriate day and time. You always have to create the order when you need to make the delivery, regardless of whether the order was created hours or days before on your platform.

4. Payment method

Your Server
There are two payment methods for deliveries. Cash and Card.

Card: When your client is paying with a credit or debit card on your platform, you only need our delivery person to pick up and deliver. so you should put Card in paymentMethod. This will cause the system to indicate to the delivery person that they should only pick up and deliver.

NOTE: This mode is simple. The delivery man picks up and delivers. Delivery (Picker cost) is charged to your Billing.​

Cash: When your client is paying for the order in cash, our delivery man pre-pays the value of your products at the collection point and recovers his money when the order is delivered. So you must put Cash in paymentMethod. This will cause the system to indicate to the dealer the value to pay at the time of picking up the product.

NOTE: This mode is a bit more complex. The delivery man pays, collects and recovers when delivering. The dealer only pays the value of orderAmount (value of the products sold). Delivery (Picker's cost) is charged directly to the end customer, this is not added to your Billing.

In case you want to charge a different value of delivery (higher or lower) this must be included in the orderAmount.

Example:

1. Sale of $10 USD on your website.

2. Queries cost of delivery with /api/preCheckout and Picker returns $2 USD to you.

3. You want to charge $3 USD for delivery to your customer, to earn $1 USD.

4. The order is in Cash.

5. You send to /api/createBooking the data of orderAmount with $11 USD ($10 USD product + $1 USD delivery profit).

6. The dealer will pre-pay you the $11 USD at the time of withdrawal. (You already have your sale and your extra delivery).

7. The delivery person collects the $13 USD from the end customer. He gets his $11 back and collects the $2 Picker cost.

Webhook registration

¿Cómo se calcula el costo de entrega?

In order for you to receive Status Updates/Order Allocations, you need to register your url or endpoint where you want us to send you these updates so that your platform can process it. You only have to do this registration once for each location for each webhook you want to receive.

How is an order assigned to a delivery person?

¿Cómo se calcula el costo de entrega?

Once the order is created, the Picker server will start the search for an available nearby courier and will assign the order. When a driver accepts the request, a POST request will be sent from the Picker server to the url that the business specified to handle the DRIVER_ASSIGNED event.

1. URL/Endpoint/Webhook DRIVER_ASSIGNED

Your Server
Picker requires that you have previously created the url/endpoint/webhook called DRIVER_ASSIGNED, where a JSON will be sent to you with the data of the delivery person assigned to an order.
{ driverName: “Conductor Prueba”, driverImage:{ original: “”, thumbnail “” }, driver: “5df280d11348c649d8f11940”, driverEmail: “conductor@prueba.com”, driverMobile: “+593999999999”, bookingID: “5df280d11348c649d8f11be” bookingNumericId: 1234, }
Copy

Webhook registration

API Reference

¿Cómo se calcula el costo de entrega?

In order for you to receive Status Updates/Order Allocations, you need to register your url or endpoint where you want us to send you these updates so that your platform can process it. You only have to do this registration once for each location for each webhook you want to receive.

Status update

API Reference
Once the order is in progress, every time there is a major status update, a POST request will be sent from the Picker server to the url that the business specified to handle the UPDATE_BOOKING_STATUS event.

1. URL/Endpoint/Webhook UPDATE_BOOKING_STATUS

Your Server
Picker requires that you have previously created the url/endpoint/webhook called DRIVER_ASSIGNED, where a JSON will be sent to you with the data of the delivery person assigned to an order.
{ statusText: “WAY_TO_DELIVER”, currentstatus: 3, bookingID: “5df280d11348c649d8f11be” bookingNumericId: 1234, }
Copy

2. States of an order

The flow of a complete Picker order has the following states:

- ARRIVED_AT_PICKUP: This status is updated when the delivery person marks arrival at the collection point.

- WAY_TO_DELIVER: This status is updated when the delivery person checks out of the collection point and goes towards the delivery point.

- ARRIVED_AT_DELIVERY: This status is updated when the delivery person marks arrival at the delivery point.

- COMPLETED: This status is updated when the delivery person confirms delivery of the order and closes the service.

Order Details (Optional)

API Reference
We know that not all platforms that can be used to integrate with Picker are 100% customizable. Therefore, if it is not possible for you to create an endpoint or webhook to receive our order update data. We've created one of our own for you to check for updates during an order.

Recommendation: The elaboration of this method should be reviewed by the Picker team prior to launching it into production, to avoid overloads of calls to the server.

1. Endpoint /api/getBookingDetails

Your Server
Picker use /api/getBookingDetails as an endpoint to receive the following data: API Key of the store and order number. With these data you can consult the updated details of the order.
fetch(“52.48.166.156:303/booking/createBooking”,) { method: “GET”, headers: { “content-language”: “en”, “content-Type”: “apliccation/json”, “Authorization”: “Bearer{{apikey}}” .then(response => response.json()) .then(result => {console.log(result)) .catch(error => {console.error{“Error:”, error));
Copy

2. Recibir BookingDetails

Tu Servidor
Picker returns a JSON with the data from BookingDetails. These data are related to all the important information of an order, updated depending on the last status of the order.
200: OK
“statusCode”: 200 “message”: “Success”, “data”: { “bookingNumericId”: 1234 “createdAT”: “2020-01-14T21:50:04.598Z”, “customerName”: “Cliente”, “customerMobile”: “+593992555555”, “statusText”: “COMPLETED”, “currentStatus”: 5, “orderAmount”: 0, “deliveryFee”: 2.2, “pickupCoordinates”: { “coordinates”: [ -79.8517301, -2.168945, ], type: “Point” }, “deliveryCoordinates”: { “coordinates”: [ -79.88705, -2.192912 ], “type”: “Point” }, “driverEmail”: “conductor@pickerexpress.com”, “driverMobile”: “+593999999444”, “driverName”: “Conductor Prueba”, “customerEmail”: “cliente@cliente.com” “currentCoordinates”: { “coordinates”: [ -79.9066651, -2.1508389 ], }, “arrivalTime”: 0, “smrURL”: “https://smr.pickerexpress.com/” },
Copy
404: NOT FOUND
“statusCode”: 404, “error”: “Not Found” “message”: “Booking not found”,
Copy
409: NOT FOUND
“statusCode”: 409, “error”: “Conflict” “message”: “You dont belong to this booking”,
Copy
If the order number you send is not found, it will return a 404 error. On the other hand, if you send a correct order number but it is not related to your API KEY, it will return a 409 error.

Past Orders (Optional)

API Reference
If you want to register in your platform a list of all the previous orders made through Picker, you can consult the data in this endpoint. Picker offers you a connection to an order control dashboard where the history is already saved. But you also have the option of storing them directly on your platform.

1. Endpoint /api/getPastBooking

Your Server
Picker use /api/getPastBooking as an endpoint to receive the following data: API Key of the location and the number of results desired and date range.
fetch(“https://dev-api.pickerexpress.com/api/getPastBooking?startDate=2020-06-01T00:00:00-05 :00&endDate=2020-06-30T23:59:59-05:00&limit=12&skip=0”, { method: “GET”, headers: { “content-language”: “en”, “content-type”: “apliccation/json”, “Authorization”: “Bearer{{apikey}}” .then(response => response.json()) .then(result => {console.log(result)) .catch(error => {console.error{“Error:”, error));
Copy

2. Receive PastBooking

Your Server
Picker returns a JSON with the PastBooking data. These data are related to all the information of the last orders made through your API Key.
200: OK
“statusCode”: 200 “message”: “Success”, “data”: { “count”: 50, “bookings”: [ { “id”: “5e456865e930c640be094569”, “bookingNumericId”: 1234, “createdAT”: “2020-02-13T15:16:53.976Z”, “customerName”: “Cliente”, “customerMobile”: “+593992555555”, “statusText”: “COMPLETED”, “currentStatus”: 5, “orderAmount”: 0, “deliveryFee”: 2.2, “pickupCoordinates”: { “coordinates”: [ -79.8517301, -2.168945, ], type: “Point” }, “deliveryCoordinates”: { “coordinates”: [ -79.898831, -2.192912 ], “type”: “Point” }, “driverEmail”: “conductor@pickerexpress.com”, “driverImage” { “original”: “”, “thumbnail”: “” }, “driverMobile”: “+593999999444”, “driverName”: “Conductor Prueba”, “customerEmail”: “cliente@cliente.com” “customerImage” { “original”: “”, “thumbnail”: “” },
Copy
The response's count parameter indicates the number of orders you've placed.

The bookings parameter of the response contains all orders.

The skip and limit parameters are used to do paging.

Tracking order

Using Websockets in Picker

The connection to Picker's websocket will allow you to integrate your own tracking into the device for your end customers.

The websocket service will notify you through a JSON object with the respective data.

There are two environments of this service, the test environment and the production environment. You can connect to them through their URL:

1) Testing: https://dev-smr-service.pickerexpress.com

2) Production: https://smr-service.pickerexpress.com


Get information about an order

In order to obtain the information of an order, it is necessary that you make a connection to the service through the token (smrToken). To do this you must send a message through the joinChatRoom channel with the token code.

You get this token when you create an order. When creating an order you would have the following response:
{ _id: 636a533dbcccc86939ad3828 bookingNumericId: 1111111 ... smrToken: 9WrnCk6yi }
Copy
Assuming that the token you have is 9WrnCk6yi, the code would be the following:
socket.emit("joinChatRoom", "9WrnCk6yi");
Copy

There are two types of messages you will receive:

1. State changes
2. Driver's current position


1) State changes

Every time the driver marks a phase as completed in his mobile application, we will receive a message with the new status of the order.

Example:
{ statusText: ARRIVED_AT_PICKUP }
Copy

The statuses you can receive are:

ARRIVED_AT_PICKUP: This status is received when the delivery person marks the arrival at the collection point.

WAY_TO_DELIVER: This status is received when the delivery person marks the exit of the collection point and goes in the direction of the delivery point.

ARRIVED_AT_DELIVERY: This status is received when the delivery person marks the arrival at the delivery point.

COMPLETED: This status is updated when the delivery person confirms the delivery of the order and closes the service.

Example:
<!DOCTYPE html> <html lang="en"> <head> <meta charset="UTF-8"> <meta name="viewport" content="width=device-width, initial-scale=1.0"> <title>Super tracking<title> </head> <body> <script src="https://cdn.socket.io/4.5.3/socket.io.min.js" integrity="sha384-WPFUvHkB1aHA5TDSZi6xtDgkF0wXJcIIxXhC6h8OT8EH3fC5PWro5pWJ1TH"> <script> var socket = io("https://smr-service.pickerexpress.com"); socket.on('connect', function() { console.log('Conectado al servidor') }); socket.on('disconnect', function() { console.log('Perdimos comunicación con el servidor'); }); socket.on("STATUS_UPDATE", (message) => { const newStatus = message.statusText; console.log("STATUS_UPDATE: ", newStatus ); }); socket.emit("joinChatRoom", "9WrnCk6yi"); // Identificador unico del pedido. smrToken </script> </body> </html>
Copy


2) Driver's current position

The device used by the driver is using GPS at the time of shipment. This allows us to send you the current coordinates of it. The message that will arrive will be the following:
{ point: [ { longitude: 1.11111, latitude: 1.11111 } ] }
Copy
This is an example implementation:
<!DOCTYPE html> <html lang="en"> <head> <meta charset="UTF-8" /> <meta name="viewport" content="width=device-width, initial-scale=1.0" /> <title>Super tracking<title> </head> <body> <script src="https://cdn.socket.io/4.5.3/socket.io.min.js"></script> <script> console.log("Conectando"); var socket = io("https://smr-service.pickerexpress.com"); socket.on("connect", function () { console.log("Conectado al servidor"); }); socket.on("disconnect", function () { console.log("Perdimos comunicación con el servidor"); }); socket.on("newLocation", (message) => { const { longitude, latitude } = message.point[0]; console.log("New location: ", { longitude, latitude }); }); socket.emit("joinChatRoom", "n3eLWs051"); // Identificador unico del pedido. smrToken </script> </body> </html>
Copy
Attention: The system may not always send you the driver's current location, as the driver may have turned it off once the trip started, however status changes will always occur.

Order Details (Optional)

API Reference
We know that not all platforms that can be used to integrate with Picker are 100% customizable. Therefore, if it is not possible for you to create an endpoint or webhook to receive our order update data. We've created one of our own for you to check for updates during an order.

Recommendation: The elaboration of this method should be reviewed by the Picker team prior to launching it into production, to avoid overloads of calls to the server.

1. Endpoint /api/getBookingDetails

Your Server
Picker use /api/getBookingDetails as an endpoint to receive the following data: API Key of the store and order number. With these data you can consult the updated details of the order.
fetch(“52.48.166.156:303/booking/createBooking”,) { method: “GET”, headers: { “content-language”: “en”, “content-Type”: “apliccation/json”, “Authorization”: “Bearer{{apikey}}” .then(response => response.json()) .then(result => {console.log(result)) .catch(error => {console.error{“Error:”, error));
Copy

2. Recibir BookingDetails

Tu Servidor
Picker returns a JSON with the data from BookingDetails. These data are related to all the important information of an order, updated depending on the last status of the order.
200: OK
“statusCode”: 200 “message”: “Success”, “data”: { “bookingNumericId”: 1234 “createdAT”: “2020-01-14T21:50:04.598Z”, “customerName”: “Cliente”, “customerMobile”: “+593992555555”, “statusText”: “COMPLETED”, “currentStatus”: 5, “orderAmount”: 0, “deliveryFee”: 2.2, “pickupCoordinates”: { “coordinates”: [ -79.8517301, -2.168945, ], type: “Point” }, “deliveryCoordinates”: { “coordinates”: [ -79.88705, -2.192912 ], “type”: “Point” }, “driverEmail”: “conductor@pickerexpress.com”, “driverMobile”: “+593999999444”, “driverName”: “Conductor Prueba”, “customerEmail”: “cliente@cliente.com” “currentCoordinates”: { “coordinates”: [ -79.9066651, -2.1508389 ], }, “arrivalTime”: 0, “smrURL”: “https://smr.pickerexpress.com/” },
Copy
404: NOT FOUND
“statusCode”: 404, “error”: “Not Found” “message”: “Booking not found”,
Copy
409: NOT FOUND
“statusCode”: 409, “error”: “Conflict” “message”: “You dont belong to this booking”,
Copy
If the order number you send is not found, it will return a 404 error. On the other hand, if you send a correct order number but it is not related to your API KEY, it will return a 409 error.

Integrate Picker with WooCommerce

We welcome you to the integration of the Picker plugin with WooCommerce, to use the Picker plugin, you must already have your business account registered on our platform. If you haven't created it yet, you can do it now by clicking Create an account with Picker.

Installation

How to install?​

1) Search for “Picker” in the Wordpress store and click install now.​

2) Activate the Picker plugin, click on the "Activate" option

Once you have the Picker plugin active, you can start configuring it.

Configuration

Additional Settings

Some additional configuration is necessary for the correct functioning of the Picker plugin. We tell you below:

 - Installation of SG Map to Address
 - Have the Google Maps API Key ready
 - Have Geocoding API, Maps JavaScript API, Places API Enabled
 - Activate the option of Pay when sending ( WooCommerce function )

Installation of SG Map to Address

In order for the Picker plugin to be used effectively, we recommend installing the SG Map to Address plugin which is complementary to the Picker plugin and has the function of allowing your eCommerce users to select their shipping location on Google Maps.

Have the Google Maps API Key ready

When you go to configure the SG Map to Address plugin in WooCommerce / Settings / Advanced SG Map to Address will ask you to enter your Google Maps API Key.

We share the SG Map to Address Documentation here.

Have Geocoding API, Maps JavaScript API and Places API Enabled

You must have these 3 API options enabled from Google Cloud Platform that will allow the Picker plugin to work correctly.

*These steps are required for Google Maps to work.

Activate the option of Pay when sending ( WooCommerce function )

When your business is affiliated with Picker, we recommend that you activate this option so that couriers can charge your customers when delivering a product.

Functionalities

Test Mode

By activating the test mode, you will be able to create orders and check the price of an order in our test environment. Keep in mind that all orders and inquiries made when this functionality is active will be pointing to our test environment. If you need to create real orders, you must deactivate this option. Consider that if you are going to use this option, the api key you use must also be from the test environment.

Own shipping fee

By activating this option, the shipping rate that will be charged to the customer can be configured from here. By having this activated, the price that the customer will see will be the fixed price that you configure. Picker's dynamic rate will not be used.

If your order is in cash, this will be the value that will be charged to the customer when the order is delivered. Important Note: This fixed shipping price is totally indifferent to the rate that Picker will invoice you for each service.

Test Mode

In the WooCommerce orders panel, you can see 2 links in the Picker section:

- View Tracking: It will allow you to view the shipping tracking of the order, which is also sent to your customer. This tracking will allow you to see live the management of your order.


- View Order in Dashboard: If you are logged in to the Picker Dashboard, this option will take you to see the detail of the order in the Picker Dashboard.

Installation

How to install?​

When you enter to download the Plugin, you will find 2 compressed files:

- The first zipped folder contains the plugin pointing to the production environment (To enter your dashboard of your company in production you must enter https://dashboard.pickerexpress.com).

- The second zipped folder, with the dev suffix, is the one that points to the test or development environment. To request a development account, you must enterhttps://picker-dashboard.vercel.app

 1) Download the Picker Plugin

Download here

 2) Click on the option “Subir plugin” , and upload it in .zip format

 3) Activate the Picker plugin

Once you have the Picker plugin active, you can start configuring it.

Configuration

Picker Plugin Settings

To connect the Picker plugin to your eCommerce you must add the API Key of the store, you can find it in your Dashboard in the Account section.

 1) Copy your API Key

2) Paste it in the section WooCommerce/Configuración/Envío/Picker

3) Save the changes to have your business data connected to your eCommerce.

Additional Settings

Some additional configuration is necessary for the correct functioning of the Picker plugin. We tell you below:

 - Installation of SG Map to Address
 - Have the Google Maps API Key ready
 - Activate the option of Pay when sending ( WooCommerce function )

Installation of SG Map to Address

In order for the Picker plugin to be used effectively, we recommend installing the SG Map to Address plugin which is complementary to the Picker plugin and has the function of allowing your eCommerce users to select their shipping location on Google Maps.

Have the Google Maps API Key ready

When you go to configure the SG Map to Address plugin in
WooCommerce /Configuración/Avanzado/SG Map to Address It will ask you to enter your Google Maps API Key.

We share the SG Map to Address Documentation here.

Have Geocoding API, Maps JavaScript API and Places API Enabled

You must have these 3 API options enabled from Google Cloud Platform that will allow the Picker plugin to work correctly.

*This option is required for Google Maps to work.

Activate the option of Pay when sending ( WooCommerce function )

When your business is affiliated with Picker, we recommend that you activate this option so that couriers can charge your customers when delivering a product.

Integrate Picker with VTEX

We welcome you to the integration of Picker with VTEX, to carry out the complete integration, you must already have your business account registered in our platform. If you haven't created it yet, you can do it now by clicking onCreate an account with Picker.

Create Application Keys for integration

In order to integrate your VTEX site with the Picker Platform, it is necessary to first create your app keys to be able to synchronize and authorize any request that will be made with VTEX. For this you must go to Account Settings> Application Keys.


Subsequently, you must click on “Manage Keys”.


Here you must click on the “Generate New” option. In the next window, you will be able to add a name to your new key.

In order for the credentials to be created to have the necessary access, you must add a role to it. As Picker will consult the orders created and the pickup points, you must add roles that have access to these instances (in the case of the demo, they will be given administrative access).

Once the key data has been saved, a screen will be presented where you will be presented with the credentials. It is very important that at this time you copy both the Application Key and its Application Token, since, after this screen, you will not be able to consult them again.


Keep in mind that these set of keys will be used for any API request that you want to make with VTEX (some of the steps that you will see below will require them).

Requirements before creating a Shipping Policy

Picker in VTEX is considered a Carrier, which must have a Shipping Policy assigned. Before creating Picker as a Shipping Policy, you must first have the following requirements:

1) Activate Geolocation Shipping https://help.vtex.com/en/tutorial/registering-geolocation--tutorials_138

2) Create Pickup Points:

https://help.vtex.com/en/tutorial/o-que-e-uma-transportadora-7u9duMD5UQa2QQwukAWMcE

a) When creating a pickup point (which for Picker represents a place in your workspace), you must create it with the same data with which you created it in your Picker platform.

b) In order to identify your Picker locations in VTEX, you must enter the API Key of your location as the Pickup Point ID.

Create Shipping Policy

To create a shipping policy, you can do it in 2 different ways:

1) Via Web Portal https://help.vtex.com/en/tutorial/shipping-policy--tutorials_140


IMPORTANT:
When manually creating a shipping policy that you want to integrate with Picker, you must enter the word “PICK” as the ID.


2)
Via API with Postman https://developers.vtex.com/vtex-rest-api/reference/post_logistics-pvt-shipping-policies

In the same way as in its version through the Web Portal, it is necessary that for this shipping policy, the word "PICK" must be entered as ID.


In addition to this, it must be taken into account that once this policy is created, they must enter the price rules for this delivery method (These prices are those that the customer will be charged and are totally independent from the prices that Picker charges for each delivery)

Create Order Webhook

Once you have all the previous steps, we are going to execute the order hook registry via Postman. This step is the most important, since once this step is entered, all orders that have the Picker shipping method will be entered into the platform.

To create the hook needed to create the order in Picker, you must run the following endpoint with your credentials https://developers.vtex.com/vtex-rest-api/reference/hookconfiguration


For this particular case, we will execute the endpoint with the following body:

Snippet
{    
"filter":{        
   "type": "FromWorkflow",        
   "status": [            
      "order-accepted"        
      ]    
    },    
      "hook": {        
         "url": "https://dev-api.pickerexpress.com/api/pushVtexOrder"    
       }
}


Before running this endpoint you should consider the following:

1) We want the order to be created in Picker once it is accepted, that's why in the status field, we use “order-accepted”.

2) It is mandatory that in the status field (even though it is an array), you only enter a single type of status, to avoid duplicating orders in Picker.

3) In url, you must enter the endpoint of the environment you want to use:

a) For test environment: https://dev-api.pickerexpress.com/api/pushVtexOrder


b)
For production environment: https://api.pickerexpress.com/api/pushVtexOrders

If you need more information about hooks, you can see it herehttps://developers.vtex.com/vtex-rest-api/docs/orders-feed#hook-notifications

Integrate Picker with Shopify

We welcome you to the integration of Picker with Shopify, to complete the full integration, you must already have your business account registered on our platform. If you haven't created it yet, you can do it now by clicking on Create an account with Picker.


You should also note that you must have a paid plan with your Shopify store.

Create Application for Your Store

To start integrating Picker into Shopify, you need to start by creating an app for your store. You can do this through the Applications > Develop applications for your store option.


Next, it allows the development of custom applications (Remember to read the terms and conditions).


Once the development of custom applications is approved, this screen will appear. Click create an app.


We create the application (in this case we are going to put Picker on it), and we proceed to click on Configure dashboard API scopes.

On this screen it is very important to have selected the following permissions that the Picker API will have. The following must be selected:

  • read_payment_terms

  • read_shipping

  • read_orders

  • read_locales

  • read_fulfillments

  • read_locations

  • read_assigned_fulfillment_orders

  • read_third_party_fulfillment_orders

  • read_merchant_managed_fulfillment_orders

Likewise, make sure that the API and Webhooks version is 2022-04


Once this is done, we proceed to click on Install application to be able to request the access token for the Shopify API services.

Please note that this token can only be revealed once. Copy it and save it in a safe place.

Set up Shopify credentials in Picker

In order to set up Shopify credentials in Picker, you'll first need to create a Workspace. Once the workspace is created, go to the Settings -> Integrations section.

Click on Change, to be able to enter your credentials. In this section you will need to add both the Access Token that you got from Shopify and the url of your site. Once added, an attempt will be made to verify the credentials in order to proceed to the next step (to verify if you entered the credentials correctly, the failed label will disappear).

Set up Shopify locations in Picker

When creating an order in Shopify, it's important to know which Picker location the order ships from. For this consideration, a relationship is made between the Shopify branches of your site with the Picker location in your Workspace. To be able to relate the Shopify branches in Picker, on the same Shopify Configuration screen, click Change. If you already have the credentials configured correctly, the Shopify branches and Picker stores will appear when you enter the Manage Stores option.


Next, you will see a list of all the branches that you have active in Shopify. If any of these branches is related to a Picker location, the name of the location to which it is related will appear at the bottom of the branch name.


To proceed to associate a Shopify branch with a Picker location, you must click on the Edit button that is next to the Shopify branch. By clicking here, a new window will appear where you can select the Picker location that you want to be related to your selected Shopify location.


By selecting the location and clicking OK, this configuration will be saved.


In this way, if a Shopify order originates from a branch, the Picker platform will know which store is mentioned and will save it when the order is created.

Integrate Picker with Store Cloud

We welcome you to the integration of Picker with Tienda Nube, to complete the full integration, you must already have your business account registered on our platform. If you haven't created it yet, you can do it now by clicking onCreate an account with Picker.

Relate Picker Store with Cloud Store

Once your Picker installation in Tienda Nube has been authorized, you must indicate on your dashboard which Picker location is the one that will handle your orders (in other words, you must select the Picker location from where your orders will be shipped ). It is very important that the store you choose has the same location and address as the one you have configured in Tienda Nube.

To configure it you must go to the Configuration option -> Integrations

Selecciona Tienda Nube

And then choose the store that should receive the orders from your Tienda Nube site. Once this is done, your integration will be ready and you will be able to receive the Tienda Nube orders to your Picker dashboard so that they can be attended by our suppliers.

Integrate Picker with Ordatic

We welcome you to the integration of Picker with Ordatic, to carry out the complete integration, you must already have your business account registered in our platform. If you haven't created it yet, you can do it now by clicking onCreate an account with Picker.

Link your Ordatic Store ID with a Picker Store

To configure Ordatic in Picker, you only need to have the ID of your Ordatic store and relate it to a Picker location. To do this, you must go to Settings -> Integrations


Escoge la opción de Ordatic

Next, you will see the list of stores that you currently have in your Picker Workspace. By selecting any of them, you will be able to save and associate the Ordatic restaurant ID with the selected store.

By entering the ID and saving, your selected Picker location will be linked to the Ordatic restaurant ID that you entered. If an order from that restaurant requires Delivery, the Picker platform will identify the location of the location through this ID and will be able to manage the order .

WooCommerce FAQs

Find here all the frequently asked questions you have when integrating Picker with plugins.

Where can I find the API Key of my company/local?

You must bear in mind that the plugin must use the api key of the local from which it is going to be dispatched. The API Key of your store can be found on your dashboard (https://dashboard.pickerexpress.com) in the Local section.

In the local registry, in the upper right part, you will find the API Key belonging to the local.

In order to use the plugin, do I have to have a specific plan in my account?

In order to use the Woocommerce plugin (and any plugin or integration via API), you must have the Picker Pro Plan activated.

How can I know if I'm correctly integrated with Picker?

Once the address and Picker plugins are installed, the best way to know if you are integrated or not is by trying to checkout on your platform with a valid delivery address (it should not be too far from the location of your store). By entering the delivery address and other necessary fields in your shopping cart, the delivery price will appear at checkout.

In the event that it does not appear, check your settings.

Will using a 3rd party plugin that I'm using for my page interfere with Picker's functionality?

Like all Woocommerce plugins, the use of several plugins can cause some of them to not work correctly. For Picker's case, it can also happen. Especially those that alter or customize the fields that can be handled at checkout (eg: Checkout for Woocommerce).


For this specific case, if the Picker plugin is not working correctly, you should check that the following are registered within the fields that you have in the checkout:


- billing_address_latitude
- billing_address_longitude
- shipping_address_latitude
- shipping_address_longitude

If you continue to have problems, you can contact us through the support channel or your business advisor to help you.

"Soon"
"Soon"

Integrate Picker with Deliverect

We welcome you to the integration of Picker with Deliverect, in order to integrate Picker with Deliverect you must already have your business account registered on our platform. If you haven't created it yet, you can do it now by clicking Create an account with Picker.

Configuring Deliverect locations in Picker

When creating an order in Deliverect it is important to know which Picker location the order is shipped from. For this consideration, a relationship is made between the Deliverect locations of your site with the Picker location in your Workspace.

In order to relate the Deliverect locations in Picker, and if your credentials are correct, on the same Deliverect Configuration screen, you can enter the following Manage Locations option.

Next, you will see a list of all the locations that you have active in Deliverect. If any of these branches is related to a Picker location, the name of the location to which it is related will appear at the bottom of the branch name.

To proceed to associate a Deliverect location with a Picker location, you must click on the Edit button next to the Deliverect location. By clicking here, a new window will appear where you can select the Picker location that you want to be related to your selected Deliverect location.

By selecting the location and clicking OK, this configuration will be saved.

In this way, if a Deliverct order originates from a branch, the Picker platform will know which location is mentioned and will save it when the order is created.

Integrate Picker with Hubster

We welcome you to the integration of Picker with Hubster, in order to integrate Picker with Hubster you must already have your business account registered on our platform. If you haven't created it yet, you can do it now by clicking on Create an account with Picker.

Configurar credenciales de Hubster en Picker

In order to set up Hubster credentials in Picker, select the Workspace you want to integrate with or create a new one. Then from the left side menu in the Settings section select Integrations. Locate Hubster and click on the blue button to start the connection process [see figure 1]. After having clicked on the Hubster connection button, a list will be displayed with the stores registered for the selected Workspace. Choose the Picker store to which you want to register the Hubster store ID provided by the Hubster team and click on the Save button.

Figure 1. Connection process with Hubster from a Workspace

Figure 2. Registration of the Hubster Store Identifier in a Local Picker.